National Geographic™ Critter Dome Assembly Instructions

 The National Geographic™ Critter Dome is a PetsMart exclusive available only from them at this time. The Critter Dome is a recommended habitat for Guinea Pigs, and other small critters. If you have purchased a Critter Dome these instructions should make assembly a snap, no tools are required.

Need parts, we may be able to help www.critter-cages.com
If you need a part drop us a note and we will check on availability.
email orderdesk@critter-cages.com 

First unpack your cage and using the parts list below check that all parts are there.Then proceed to step #1.

 Step 1

 Insert Shelf into one end of the Base.

 Step 2

Place Wire on top of the Base. Then lock it down to the Base with all 4 Clips.


Step 3

 Insert the Hay Feeder from bottom to top making sure that the tab on the bottom gets inserted into the groove of the Base. Then push the grooves onto the rest of the wires, the top should insert into the 6th gap from the bottom of the wires.
Important: Very young Guinea Pigs may not be able to access the Hay Feeder easily. If this is the case place the Hay on the cage floor until your critter is large enough to access the Hay Feeder.

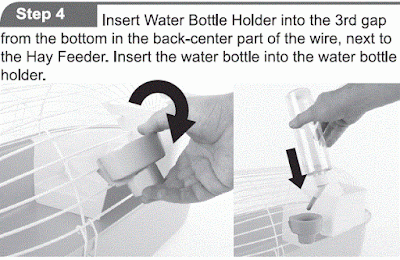
Step 4

Insert the Water Bottle Holder into the 3rd wire gap from the bottom in the back-center part of the wire, next to the Hay Feeder. Insert the Water Bottle into the Water Bottle  Holder.
Tip: After completely filling the Water Bottle and screwing on the cap, gently squeeze the sides to create a vacuum this reduces the risk of leaking.

Step 5

Place the Food Bowl in the Base.
 

Finished Your new Critter's new Home is ready for move in.

Cleaning: Wash parts with a mild detergent, rinse thoroughly and dry with a soft cloth.  

Comments

  1. I have had one of National Geographic™ Critter Dome Guinea Pig Cages for about 2-3 months and I have to throw it away because the whole bottom has fallen out. The seams of the cage came apart and the whole bottom fell out when my daughter picked it up to clean it. We have had guinea pigs and cages for over 5 years and this is the first one that ever fell apart like this. What can we do?

    ReplyDelete
  2. You have made an exceptional appearing. I will in all probability tunnel it and for the most part recommend to my sidekicks. I am certain they will be benefitted from this site.
    cool guinea pig cages

    ReplyDelete
  3. Much obliged on your wonderful posting! I really delighted in understanding it, you might be an awesome author.I will make a point to bookmark your blog and will in the end return further down the road. I need to empower proceed with your extraordinary employment, have a decent day
    eubookshop com

    ReplyDelete
  4. This is a decent post. This post gives genuinely quality data. I'm certainly going to investigate it. Truly extremely valuable tips are given here. Much thanks to you to such an extent. Keep up the benevolent acts.
    the online dog trainer review

    ReplyDelete
  5. The information you provided is beneficial. This is a very informative blog.If you need shirts that will make her feel confident and stylish.Shop the best variety of shirt for girls at affordable today that she'll be sure to approve of.

    ReplyDelete

Post a Comment

Popular posts from this blog

You & Me Rat Manor by Petco Assembly Instructions

If you have purchased a You & Me Rat Manor , from Petco or others and can't find your instructions or you would like to see how easily it goes together before you buy.  Just keep reading as we lay out how to put your You & Me Rat Manor together. If you are actually looking for replacement parts for this Cage, we have them available at Critter-Cages.com Assembling the You & Me Rat Manor One of the best things about this cage is that no tools are needed for assembly. Make sure you have all the parts as listed:   Step 1 Place the Wire Cage on a flat surface and carefully unfold all of the panels as shown in the image .  Step 2 Connect the bi-folded front cage panel (the one with the doorway) to the left bi-folded side panel as shown. The "J" shaped wire hooks are specially designed to hook onto the side panel again to create a woven connection joint.  Step 3 Next connect the bi-folded back panel to the left side panel by atta

Grreat Choice® Deluxe Playground Cat Tree Assembly Instructions

If you have purchased a Grreat Choice® Deluxe Playground Cat Tree from PetsMart and have misplaced the assembly instructions this post should help get back on track. If you have had your Cat Tree for a while and it is looking a bit ratty. If you need to replace parts we can help critter-cages.com carries parts for this item. If you do not see a part you need listed give us a call 310 832-9981 M-F 10 am to 6 pm Pacific Time or drop us an email at orderdesk@critter-cages.com and we will check on availability.  We also stock lots of toys, treats and equipment for all your furry feline friends and other critters to! Parts Replacement 11" (H) Post WA 901798 Replacement 4" (I) Post with Screw WA 901799 Replacement 8" (J) Post WA 901800 Replacement 15.5" (K) Post WA 901801 Replacement 7" (L) Post WA 901802 Replacement 15.5" (M) Post with Screw WA 901803 Replacement 23" (N) Post with Screw WA 901804 Replacement Hardware Pack WA 901790   Put

All Living Things Rabbit Hutch Assembly Instructions

 If you have purchased an All Living Things Rabbit Hutch from PetsMart and have misplaced the assembly instructions this post should help get back on track. If you have had your cage for a while and need to replace parts we can help critter-cages.com carries parts for this cage. If you do not see a part you need listed give us a call 310 832-9981 M-F 10 am to 6 pm Pacific Time or drop us an email at orderdesk@critter-cages.com and we will check on availability.  We also stock lots of toys, treats and equipment for all your critters. Putting your All Living Things Rabbit Hutch Together Before you start assembling your new All Living Things Rabbit Hutch it is a good idea to lay out all the parts and make sure they are all there.  The graphic below will help you check.  Assembly is easy if you follow the instructions, the only tool needed to assemble this Hutch is a Phillips screwdriver. If you find there are parts missing contact the manufacturer's customer service depart